

How to Set Up SFTP Server on TrueNAS SCALE Using SFTPGo (Step-by-Step Guide)
How to Install and Configure SFTPGo on TrueNAS Scale: Secure FTP Made Easy!
Step 1: Log in to your TrueNAS SCALE server and click on Datasets from the left sidebar.
Step 2: Create the SFTP Dataset
Click Add Dataset.
Fill the fields as shown:
-
Name:
SFTP-Data -
Comments:
for FTP -
Sync:
STANDARD -
Compression Level:
LZ4 -
Enable Atime:
OFF -
Share Type:
Then click the Save button at the bottom.Apps
Step 3: Search and Select SFTPGo App
Go to the Apps section from the left sidebar.
In the search bar, type SFTP.
Locate the SFTPGo app from the results.
Step 4: Install SFTPGo
Click on the SFTPGo app from the search results
On the app info page, click the Install button
Step 5: Set Application Name and Version
Enter a name for your app, e.g., sftpgo
Select the version , etc.
Step 6: Set Certificate, Port & Storage
Under Certificate, select: truenas_default
Set a custom Web Port for the SFTPGo web UI
In Storage Configuration, for Type, select : ixVolume
Step 7: Mount Dataset and Install SFTPGo
Under Host Path, select your created dataset path
Set SFTPGo Backup Storage Type to ixVolume
Click Install to deploy SFTPGo
Step 8: Verify Deployment
Once installed, go to the Installed Applications tab
Confirm that SFTPGo is in Running status
Step 9: Access SFTPGo Web Portal
After the app shows Running, click on the Web Portal link from the right-side panel
This will open the SFTPGo admin interface in a new browser tab using the port you assigned (e.g., http://your-ip:30086)
Step 10: Complete Initial Admin Setup
On first launch, the SFTPGo WebAdmin page will open
Login and Click “Create admin and Sign in”
Step 11: Add More Admin Users (Optional)
In the SFTPGo WebAdmin panel, go to Admins from the left sidebar.
Click the blue Add button to create additional admin accounts
Step 12: Add an SFTP User
Go to Users > click Add
add new user
Optionally enable Require password change.
Click Save to create the user
Step 13: User Login to Web Client
Open your browser and go to the SFTPGo WebClient URL
Enter the username and password
Click Sign in
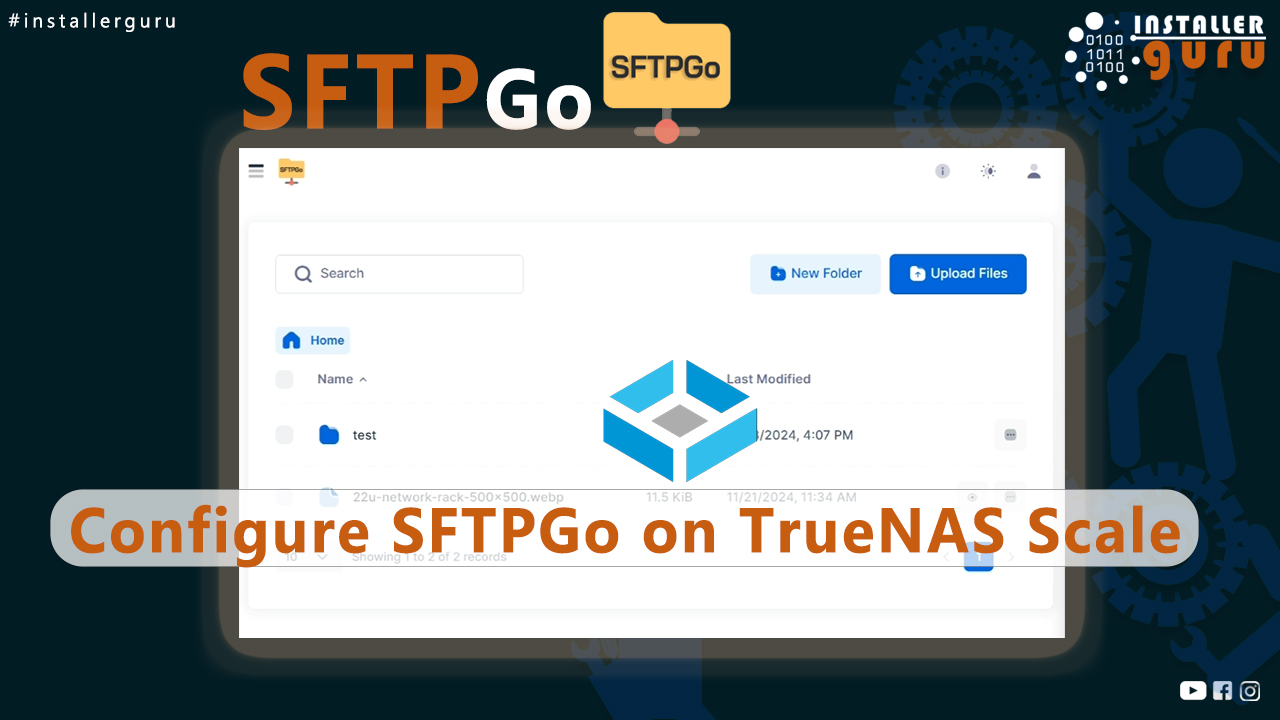
Step 14: Access and Use the SFTPGo Web Client
Once logged in, you’ll see the WebClient Dashboard
From here, users can:
Browse their home directory
Upload files or create new folders
View, download, or manage existing files
You’ve successfully deployed a secure and easy-to-manage SFTP server using SFTPGo on TrueNAS SCALE with Docker containers. From dataset creation to user access, this setup is ideal for personal and enterprise file transfers.
Congratulations! You can now enjoy hassle-free file transfers with #InstallerGuru – Installation made easy.
https://youtu.be/FW0DYpbWUj4